The following screen captures illustrate the use of our routing snowmobile trail map on a Garmin Nuvi 500 GPS. Although the screen-shots are specific to this model, routing functionality will work in a similar fashion for all newer models that support routing.
Where To? .. with a routing trail map
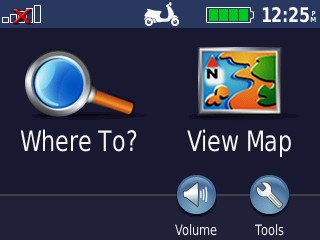
The Where To? function is the command that you use to initiate automatic navigation. This commands the GPS to calculate a route from your current location to your desired destination. When using a routing highway map, it will route you along highways and roads. When using an routing snowmobile trail map, it will route you along snowmobile trails! Non-routing maps, such as topographical maps and inferior trail maps will only calculate a route in a straight line "as-the-crow-flies".
Make sure to ask whether a trail map supports routing along trails before you buy. If it does not, you will not be able to use many of the valuable navigation features that your GPS was designed to perform. If they tell you something lame like "Autorouting takes all the fun out of it" they are clearly attempting to hide the deficiencies of an inferior product.
Contrary to what some map sellers may tell you, the "breadcrumb" tracking and trackback features built-in to most GPS models is no substitute for autorouting. Assume you have enabled your track log all day, as you ride different loops and put on many miles of trails just wandering around exploring and enjoying the trails. When it comes time to go back to camp, "tracking back" along that path you logged simply reverses the entire days ride to get you back home. That probably mean lots of looping and wasting time backtracking on all the trails you have already ridden. That is certainly not the most efficient way home. Contrast that with a routing trail map where you can say Where To? and specify a single waypoint (favorite) that you previously saved identifying your camps position. A routing trail map will route you in the most direct and fastest way along trails, even if you have never been on them before. The same holds true for navigating to a gas station or restaurant. A non routing map will tell you how far it is flying over the trees in an airplane. A routing map will tell you how precisely how far to you destination along the trails, and list each trail, each turn and estimate your time of arrival.
The remainder of this article describes in more detail some of the benefits of using a routing trail map.
It is important to only have a single routing map enabled at a time. So, if you want to route by snowmobile trails, make sure to TURN OFF routing highway maps. Otherwise it will try and route you by highways and roads instead of snowmobile trails! Conversely, if you want to route by highways and roads in your automobile, TURN OFF the routing trail maps.
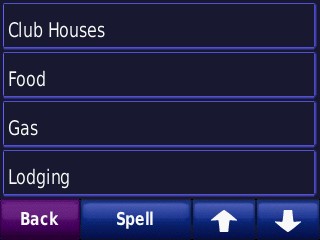
Where to? Custom POIs
Stop at an intersection. Preview where you are by zooming out, scrolling around the map and looking at the trails around you. Need some GAS, because the tank looks low? You can search for Points of interest which are classified by type and ordered by the closest to your present location.
Use Where To?->Extras->Custom POIs->Gas
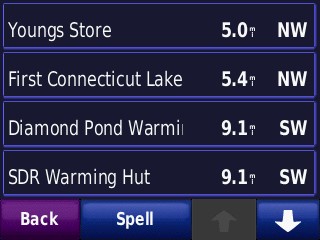
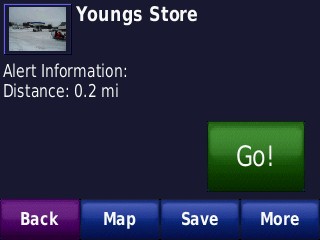
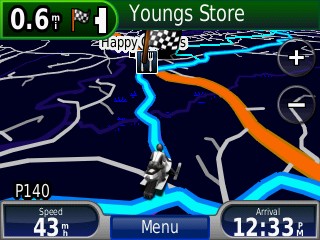
CLICK GO to navigate to Young's Store for Gas!
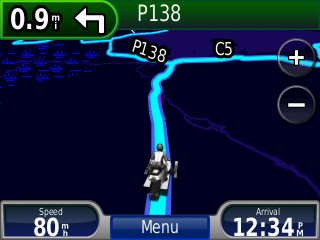
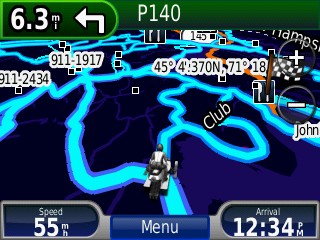
Automatic Navigation begins with spoken turn by turn instructions and visual map clues
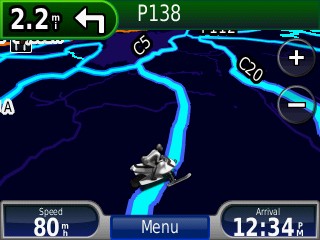
With your helmet on, and that 2-cycle engine humming away, it is unlikely you will hear the spoken directions. But, the visual indicators on the screen are more than adequate to effortlessly navigate you to your destination. The upper left hand corner indicates that you have 2.2. miles to the next turn, which will be a left onto Primary trail 128. Your current speed is indicated on the lower left. (Note: 80 mph in this screen-shot was simulated and no NH speed laws were actually broken.). Your estimated time of arrival (ETA) is constantly recalculated based on your actual speed and progress and displayed on the lower right of the screen. (See special note below on the accuracy of calculated ETA)
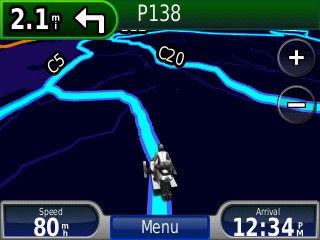
As you ride, the position of your vehicle (sled) will be seen riding along the trails. If the trail map is imprecise as little as 50' you might get an annoying "RECALCULATING" announcement as the GPS thinks you have strayed from the intended route. This is one of the things that makes creating an auto-routing map difficult. Precision matters, and it is the precision of our trail maps that differentiates them from others. Our trail maps are not perfect, so route recalculations may happen from time to time.Even that is preferable to a map that never routes along trails!
View the Route Plan and get a list of turn by turn instructions
To display the route plan, click on the bar at the top of the screen when the GPS is routing. ![]()
Note: it is a good idea to preview the route plan prior to starting out on it to make sure that it does not include any Highways or roads.
Use the arrow button to scroll through each leg of your route as shown below.
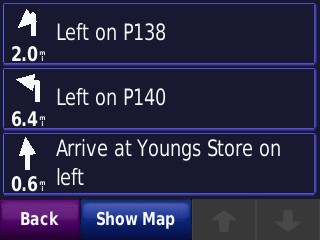
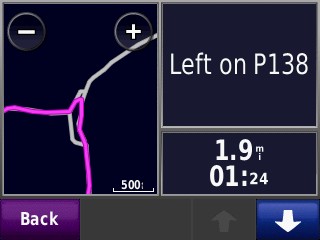

If you click on the top bar (green) of the display a scrolling list of turn by turn directions will be shown. Click on any item in the list and it will show the intersection details and the turn. Scroll from one to the next in the order that you will encounter them. The on-trail distance and ETA of each leg of the route is also shown.
Note: Since trails have no official speed limit that indicates realistically how fast you can ride, ETA times may differ from reality.
Preview your whole route by clicking the Show Map button
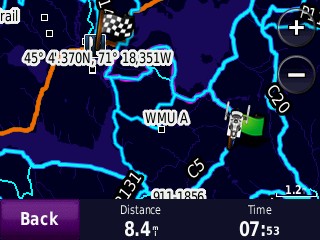
The sled icon identifies your current position, green flags are the start position and via points, and the checkered flag is your destination. A purple trail (just barely visible here under the cyan trail) is your route. The purple should be on top and more clearly visible, but this was captured from a beta version.
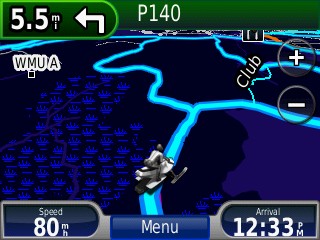
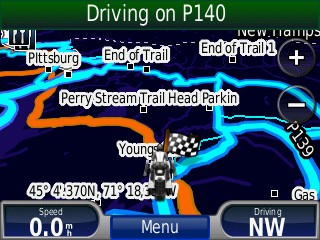
Ride to your destination, glancing briefly at the GPS now and then
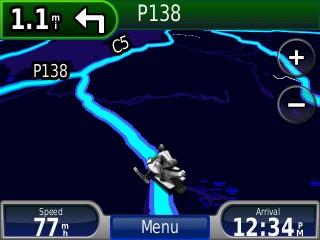
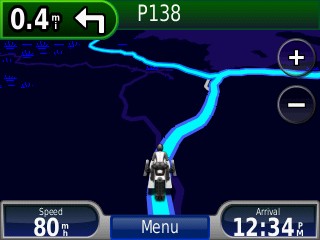
Distance to your next turn is indicated in the upper left hand side of the screen. That is very important because it gives you a heads up on how soon you need to be looking for a turn. This is information that a non-routing trail map can not provide. Orientation of the map moves as you turn when in 3d mode or Track Up mode. ETA is indicated in the lower right hand side of the screen.
You can Zoom Out for a wider view
Click on the + and – buttons to adjust zoom.
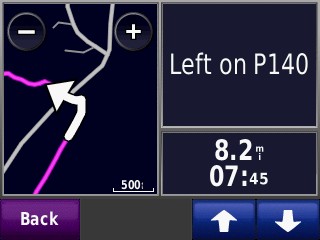
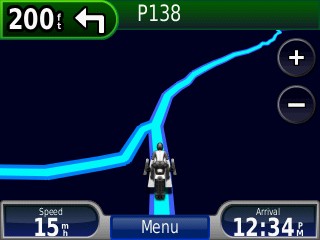
Keep riding, reassured by the visual screen prompts
Turn arrows will be displayed on most (but not all) trail intersections. They are limited to intersections where you turn onto a differently named trail.
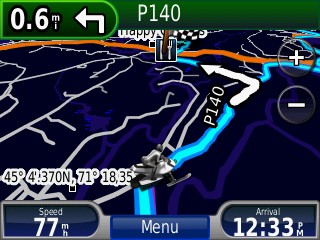
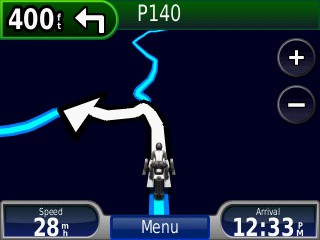
When you get to within several hundred feet of the turn the display will change and add a visual turn arrow indicator. You may not see an arrow indicator if the upcoming trail is simply a continuation of the named trail that you are already on.
Speed limit settings, ETA, and avoiding roads and highways
Some GPS models such as the Nuvi 500 have built-in routing highway maps that cannot be completely disabled. Even if these built-in maps are disabled, the GPS may still try and route you along highways and roads instead of snowmobile trails. To reduce the probability of this occurring , we set snowmobile trail speed limits to be higher than the legal trail speed limit of 45mph.. If the GPS navigation preferences are set to Faster Time, then the GPS will tend to select snowmobile trails over a highways or roads. While this will usually route you along snowmobile trails, it may from time to time try to route you on highways and roads. For this reason, it is a good idea to preview the route that the GPS calculates to verify that it is not directing you on roads or highways that are not legal snowmobile trails. Preview the route before you start traveling it.
The higher than normal speed limits set on trails also has the undesirable side effect of causing Estimated Time of Arrival (ETA) to be miscalculated by the GPS.
A simple mental calculation can be used to correct the GPS calculated ETA. Since the speed limits are approximately twice the legal limits (and prudent speeds), you can try doubling the time that it will take to arrive at a given destination. You may need to make adjustments to this calculation based on your riding style.
Avoiding Ice Crossings
Ice Crossings (across lakes and streams) are set to be Toll Roads on our GPS routing map. No, you will not be charged a fee cross a lake by snowmobile! But you can use this to avoid ice crossings which can be dangerous, especially during the early and late season where the condition of the ice may be hazardous. Set your GPS navigation preferences to avoid Toll Roads. This will cause the GPS to calculate a route to your destination that avoids ice Crossings (Toll Roads) even if crossing a lake would be the faster or shorter route.
Avoiding Off-trail riding
Increasingly, the map includes off-trail riding trails. These trails are typically logging roads in very remote areas, They are not maintained by any snowmobile club, will not have trail signs, and may include hazards well above what might be expected on a maintained snowmobile trail. It may not even be legal to ride a snowmobile on these trails. The decision to ride these trails rests solely with the sled operator, based on local knowledge and personal preparedness. The map simply indicates that it may be possible to ride in these areas for those who are well prepared to handle the unexpected and self-rescue.
For the majority of sledders, these trails should be avoided. To prevent your GPS from routing you on off-trail riding trails, set your GPS Avoidances to avoid Ferry routes..
Detours
If you encounter something that prevents you from continuing along a calculated route, such as a trail closure, downed tree, or un-groomed trail, you can press the GPS Detour button. On the nuvi, this button appear on the main screen whenever the GPS is navigating to a destination. A new route to the same destination will automatically be recalculated from your current position where you encountered the obstruction to the previously calculated route. The Detour button does nothing useful on a non-routing trail map.
Route Pre-Planning
All of our snowmobile trail maps are routing. The maps that are installed in MapSource and Basecamp can be used to create custom routes that run along snowmobile trails. These custom routes can then be downloaded to your GPS. This is a great way to plan a trip, or create a custom route of your favorite trail loop. You can save several on your GPS for use out there on the trails. You can share these with your buddies who also have routing trail maps from BackwoodsGPStrails.com. For more details see, Route Planning with MapSource. Route planning can be accomplished in a very similar way using Garmin BaseCamp. One advantage of using BaseCamp for route planning is that you can view the trails superimposed over a topographical map. See the BaseCamp Tricks article to learn how this is accomplished.