A major advantage of having a routing trail map installed in MapSource is that custom route planning can be performed on your computers larger screen. Creating custom routes along snowmobile trails is greatly improved over a non-routing trail map, and many additional useful bits of information can be derived from the map.
For this exercise we will do some planning for a hypothetical trip to the Great North Woods area of Errol and Pittsburg NH.
Routing to Trailer Parking
The first order of business is to pick a starting point, which is usually a place to park the trailer and unload.
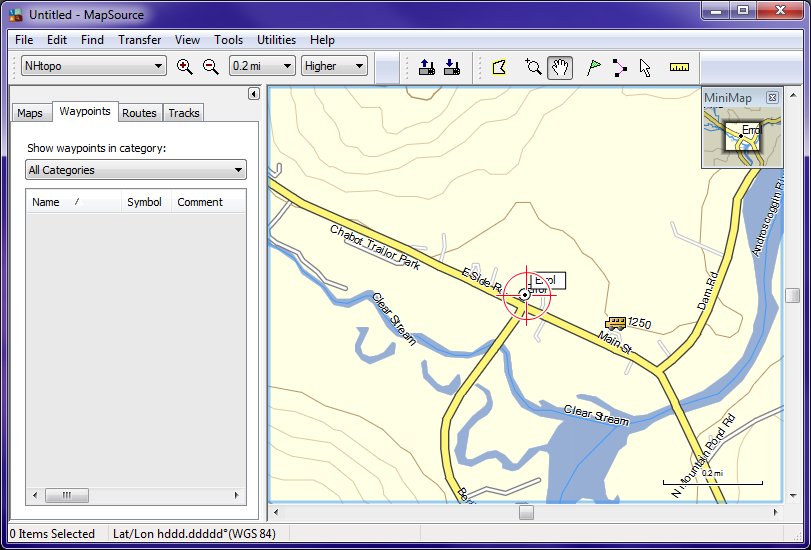
Select a highway or topographic map in MapSource. In this example we use the free G&F NH topographic map available on our website. Use View>Zoom out Region to center the map.
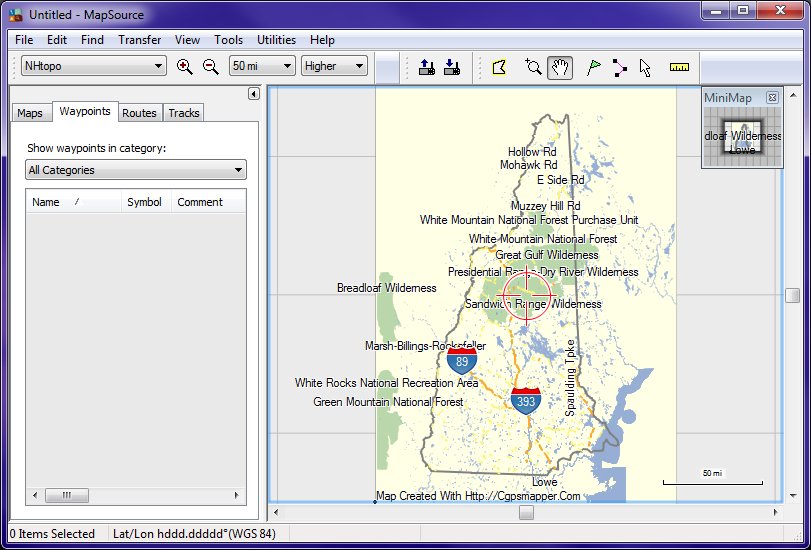
Highway maps and topos often have searchable city indexes which our trail maps do not. We know that Errol is in the northern part of the state, so zoom and scroll to the northern part of the state. The find nearest places limits the search distance, so to find Errol we want to get close.
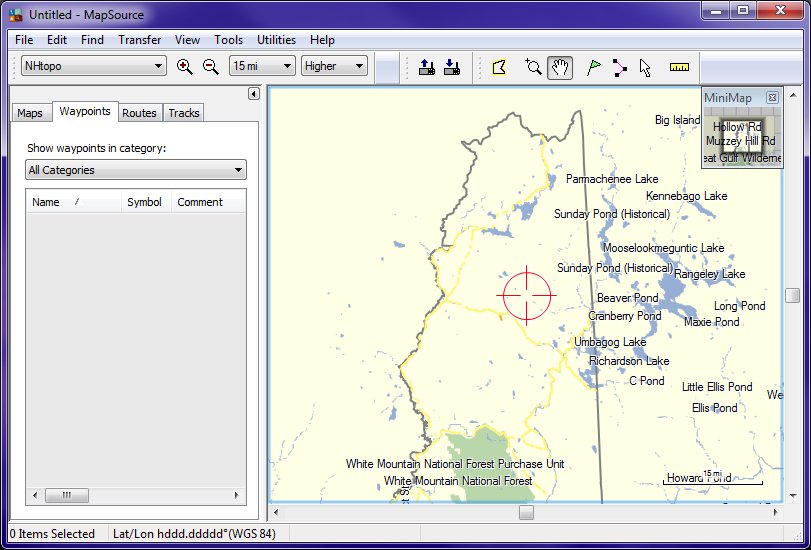
Now we can search cities for Errol. (Errol is a City? I guess so. Who would have thunk it?) . Find-> Nearest Places…
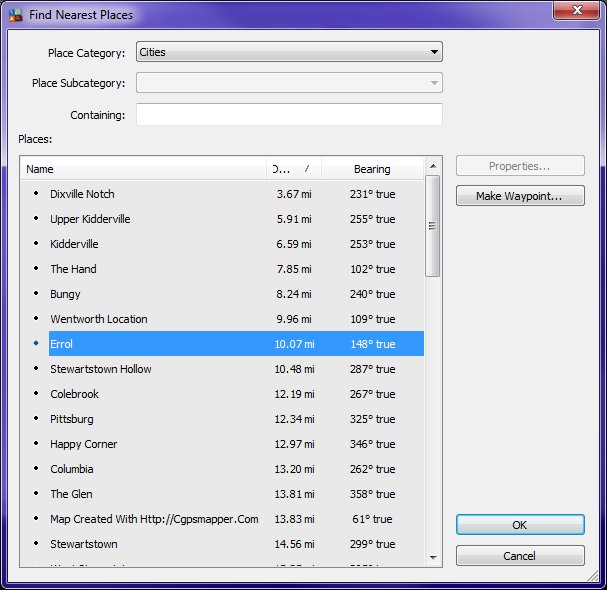
Found it!
Now lets switch maps to the snowmobile trails map. Use the map drop down in the upper left corner and select Backwoods Snowmobile.

Create a universal waypoint (Favorite) to Trailer Parking
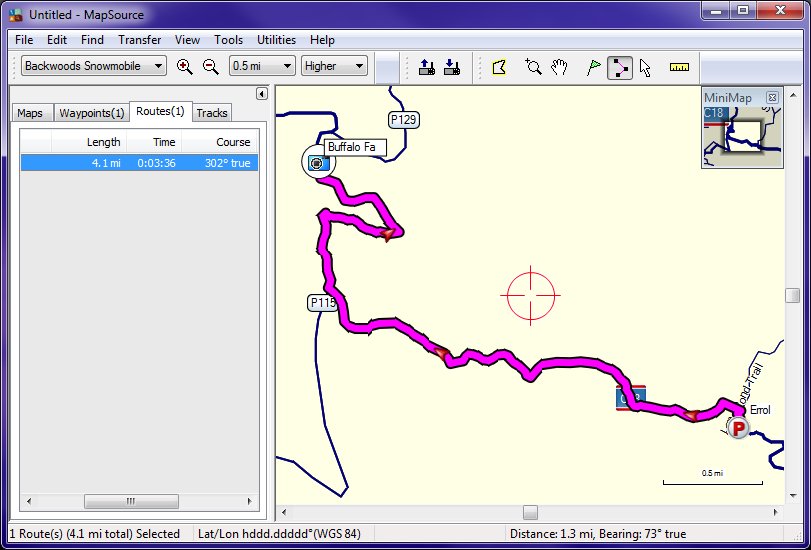
One thing we see is a parking place in the heart of the metropolis of Errol. Since it is right on Corridor 18, and there is food and fuel nearby, it's a good place to start our expedition. We will want to use our GPS to drive to the trailer parking lot in Errol, but it is unlikely that particular waypoint (or POI) is on any highway map. The solution is to create a waypoint (or favorite) that we can reference from any map. Select the parking lot icon, and then right click to create a waypoint.
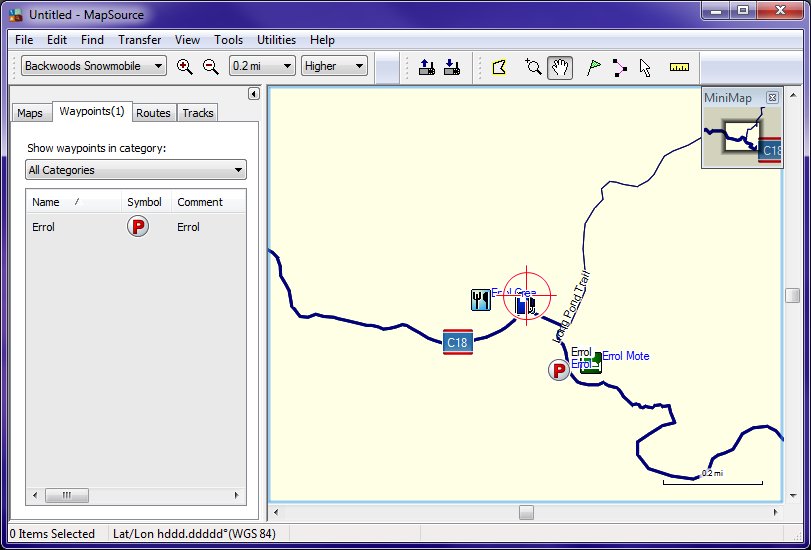
The waypoint show up in the left pane, If you have a routing automotive map installed in MapSource (which I do not) you can display a route from your current location to the parking lot in Errol. That's one way to plan the driving portion of your snowmobile trip. If you download the parking lot waypoint to your GPS, you have a destination to drive right to the parking lot, calculate your estimated time of arrival and the distance using your GPSs highway map. But the biggest benefit is that it will take you to the right place. I know for a fact that there are no signs indicating this parking lot. It is behind a snowmobile service business, and you might assume that the trailers are either for sale, or for repair, If you pull into town late in the evening, you will probably not find any locals to ask, since the town rolls up it's streets at about 7:00 pm! This one little waypoint can be worth it's weight in gold.
Ok, so we have a way to get to the trailhead eliminating many of the potential pitfalls of finding a place to park and unload. The next step is to plan the RIDE our sled!
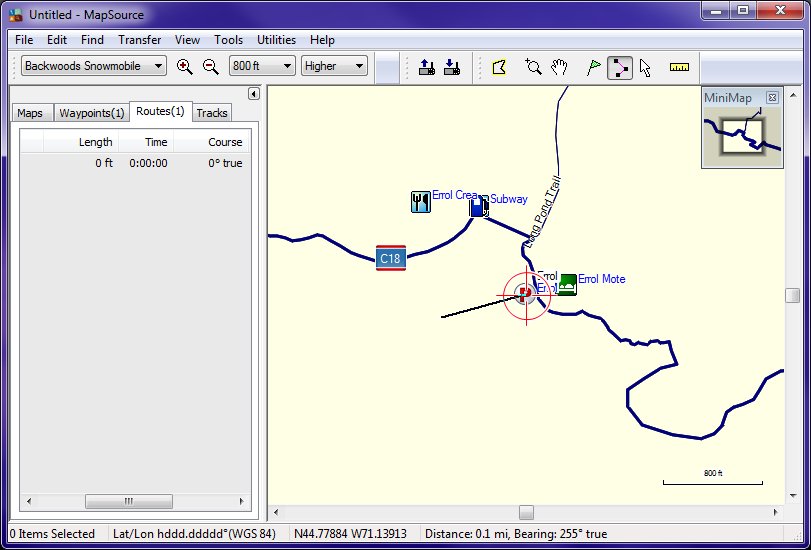
Plan a Route along Snowmobile Trails
The next step is trail route planning. Since we are parking in Errol, the first route point of our trip is the parking lot. Select the routing point tool ![]() and click on the maps parking lot icon. This creates the first routing point on our trip. The Routes Tab will show 1 route and indicate the first point on that route.
and click on the maps parking lot icon. This creates the first routing point on our trip. The Routes Tab will show 1 route and indicate the first point on that route.
Using POIs as points along a Route
Usually you have some idea of where you want to ride, perhaps from discussion in one of the many snowmobile discussion groups on the internet. So you have heard of a few scenic spots along the tails that you would like to visit, but you have no idea of how to get to them. One of the interesting things in Errol is the Buffalo Farm. People talk about it all the time in the discussion groups. Since it is on our trail map, lets make that a destination. Use Find-> Nearest Places -> All Points of Interest…
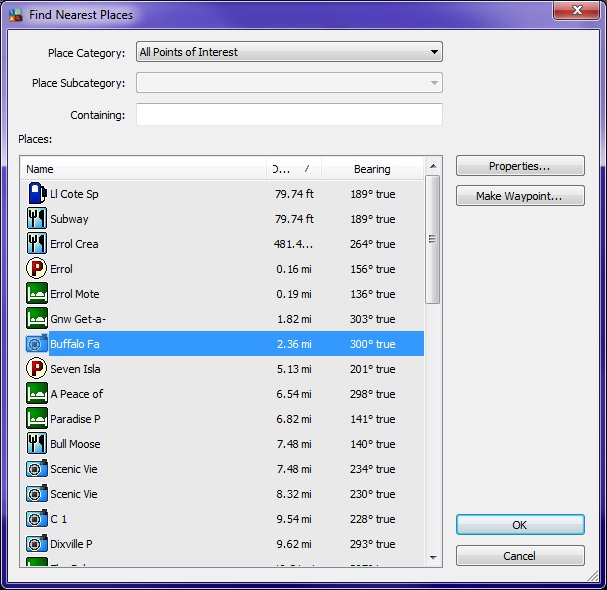
Click on the icon and hit OK. The Buffalo Farm map point will show up, centered in the map, We could create a waypoint for it, but there is really no need to because we will only be visiting this by sled. That map point is already on the trail map. What we want to do is route to it by snowmobile trail, and make some decisions about whether it is worth going to as our first via point along our ride.
If the routing tool is still selected and the mouse pointer on the screen you will see a line attached to the mouse pointer. This means that if you click someplace on the screen, that point will become the next routing point. If you click on a POI icon such as the Buffalo Farm map point, that point becomes the next point along your planned route. If you click on a trail, that spot along the trail becomes the next routing point. POIs are more easily distinguishable from points along the trails because they have recognizable names such as "Buffalo Farm".
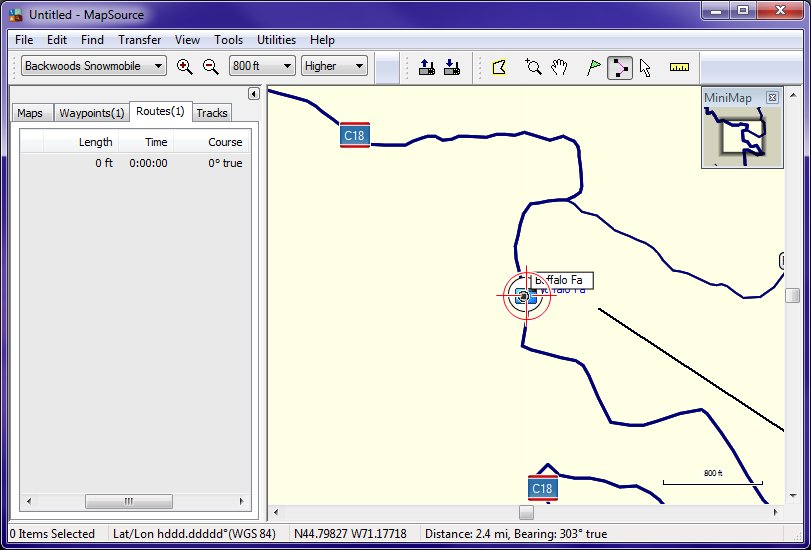
If you on a POI a waypoint will be created as a next routing point. Lets click on the Buffalo Farm and see what happens…
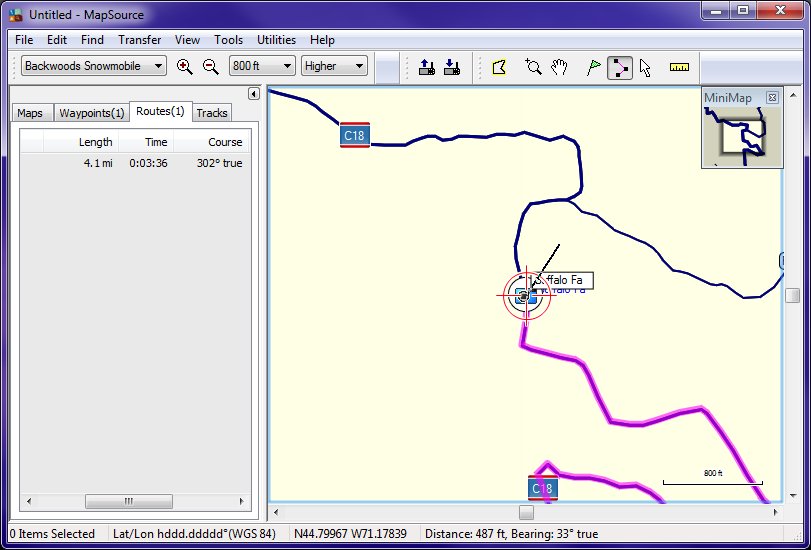
Notice a couple of changes. First, part of the snowmobile trails (C18) turns to a purple color. This indicates that the route has been calculated to run ALONG A SNOWMOBILE TRAIL.! Secondly, the Routes Tab indicates that the total route is now 4.1 miles long. A non-routing map would only show a straight line between the parking lo and the buffalo farm (as the crow flies) and you would not have a true indication of the distance along trails between the two points. The added value of a routing map begins to become clear.
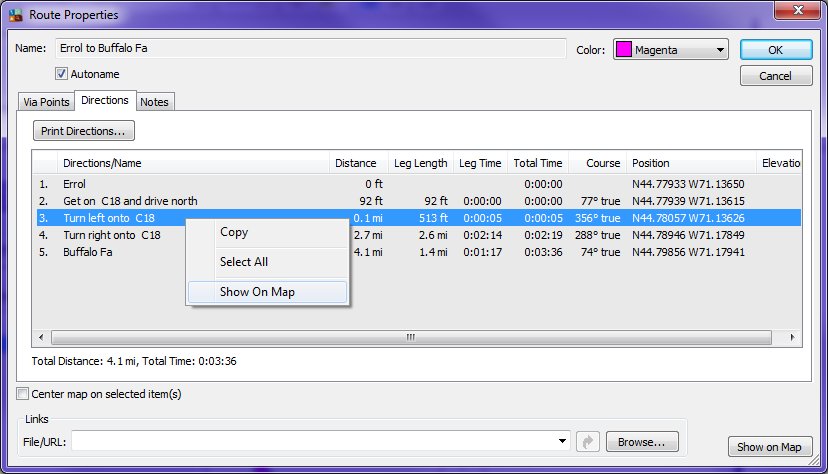
We can learn more about this simple route. The route listed in the routes tab is active. Double click on it and a detailed window opens.
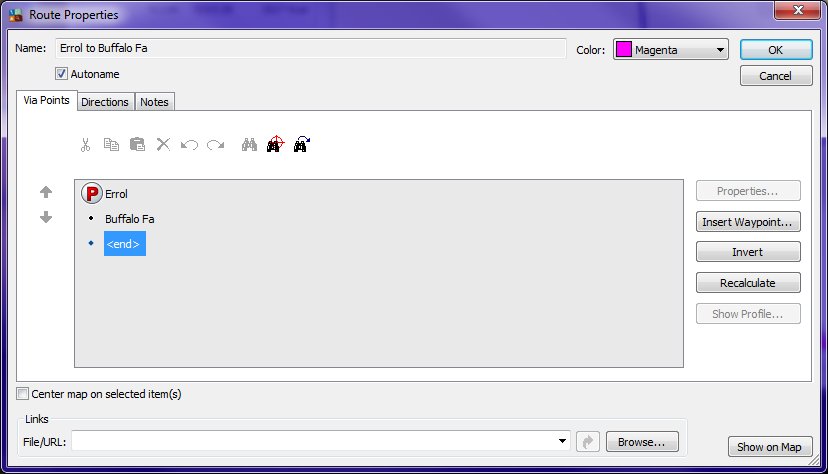
We note that the route is automatically given a name "Errol to Buffalo Fa" and it consists of two points, the parking lot, and the Buffalo Farm. We can select different colors for the route.
Detailed Route Directions and Turn by Turn instructions
If we click on the Directions Tab, we see more interesting detail.
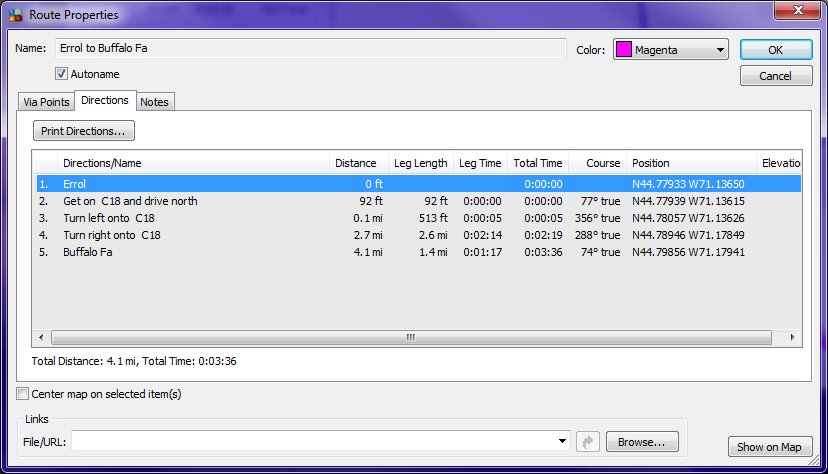
The directions expands on the via points tab in that it shows each turn along the snowmobile trails. The length of each leg and the distance between each turn is displayed. The directions/Name column displays text for directions for that leg, and reflects to some degree what the spoken turn by turn directions on the GPS will be. Now, we were zoomed in to the Buffalo Farm icon. To get a wider perspective of the whole route, click on the Show on Map button.
Displaying particular points along a Route
Additionally, you can right click on any item in the list and show that particular point on the map. Next we right click on our first turn and Show it on the map.
.jpg)
Lather, Rinse, Repeat
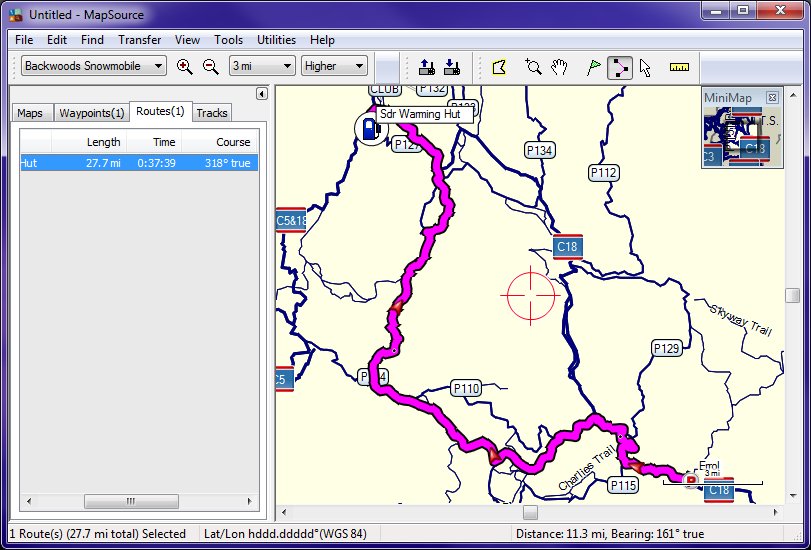
Now, by repeating this process we will plan out the rest of our trip. We pick the next point on our route, take a look at the route details to see how far it is to the next point, the trails that will be taken and other interesting facts that we can use to decide if this is a good way to go. In this example, we will pay a visit to the scenic overlook at Dixville Peak. We have a POI for that location on the map so we will find it and select it with our routing tool. That makes our trip total 16.6 miles. There was no backtracking, so lets continue to the next stop. We know that the SDR warming hut is a nice place to make a quick stop for a hot cup of coffee and some lively discussion with other sledders. That stop makes our trip total 27.7 miles, and still we have not ridden the same trail twice.
Display Route on other Maps
So far so good. It is interesting to note that you can switch maps, and the route is still displayed over any map you select. This can be very useful to see where your route takes you in the context of a topographic or highway map. That can tell us things like whether we are traversing over any high elevation trails that might have good deep snow. Lets switch to the NH topo map.
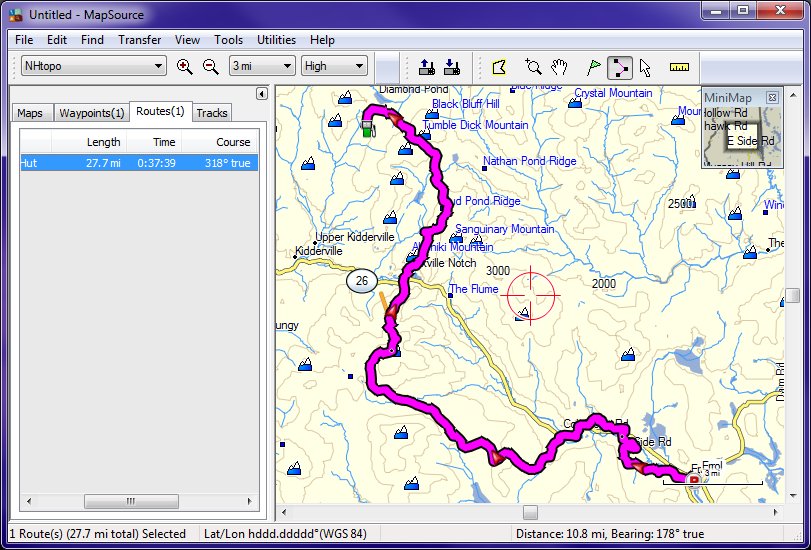
A routing map knows the way, a non routing map is just a rough approximation.
Of course you can zoom in very close and view topography, highways, lakes and streams that are not present on the snowmobile map. Now the topo map we selected is not routing. We can right click on the route in the Routes tab and select Recalculate. This will recalculate the route in the non-routing context of the topo map. The result will be a point to point straight line route as you would see with any non-routing map. The directions are much less detailed, and the total distance is wrongly reduced from 27 miles to 16.5 miles.
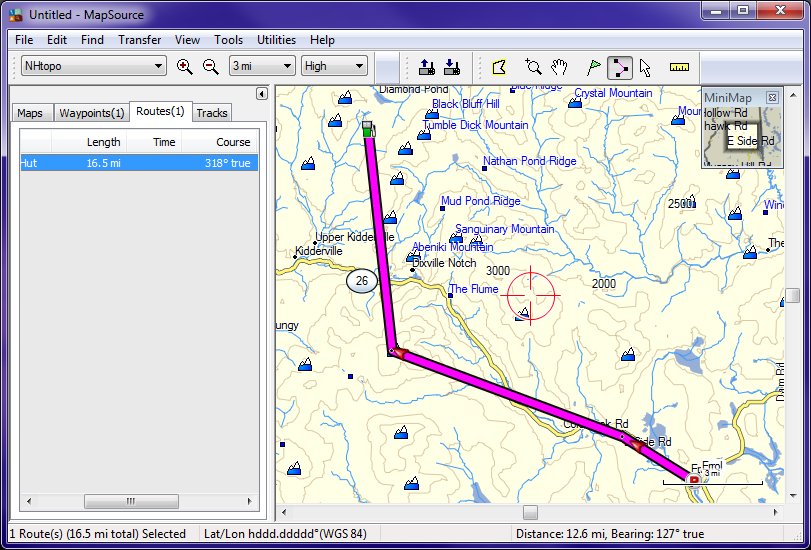
Route calculation occurs in the context of the current map
Not to worry. Just switch back to the routing trail map and recalculate. If you had a routing highway map, then you could see how to drive by roads to near the same route points.
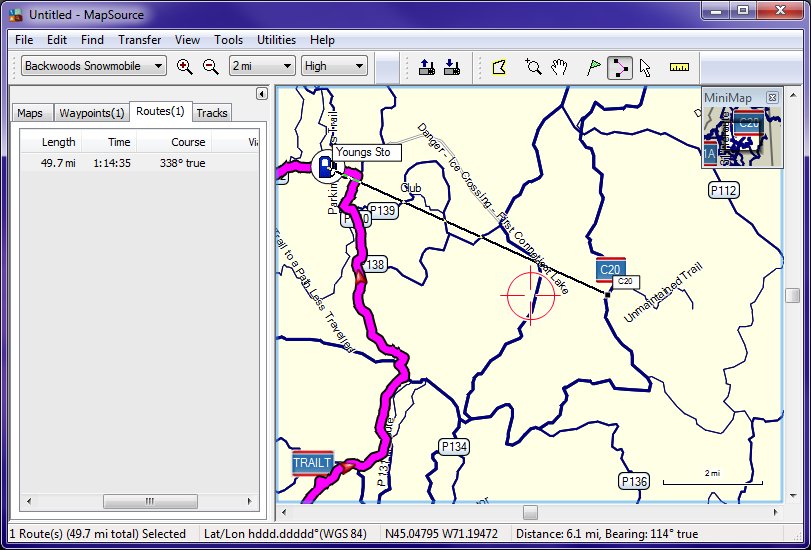
Next we will route to the Buck Rub Pub for lunch, and then a quick stop at Young's to top off the gas tanks. Total trip so far about 50 miles. Not bad for a half a days ride. But we should start thinking about returning to Errol. The fastest route home might be a return on the same trails, and in fact that is the case on this trip. It is preferable to make the days ride a loop, and avoid riding the same trails twice, So lets head over to trail 20 and return by a more easterly route. This time, instead of a particular POI, we will just click at a spot on Corridor Trail 20 as the next leg of our return trip. Note that if a route point is not on a snowmobile trail, it will route you some portion of the way to that point off-road (or in the case of a trail map off-trail) as the crow flies.
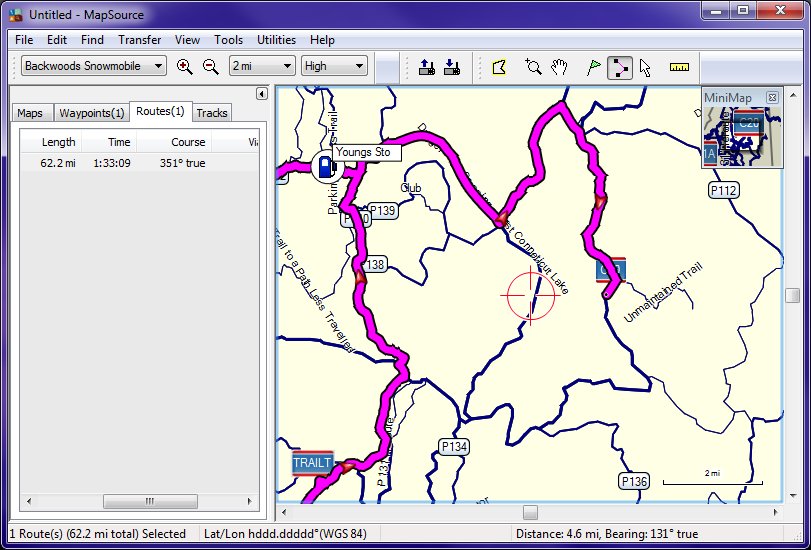
Then we will click on C 18, and then finally to the Errol Parking lot. Total miles 93.3. That's not a bad days ride. Lets take a look at the entire trip.
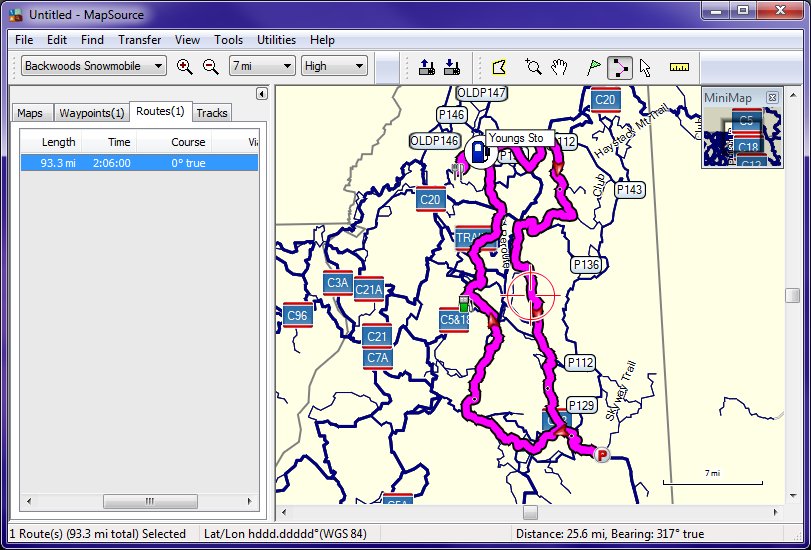
We see a nice loop where we do not do any backtracking except for the ride between the Buck Rub and Young's. I think that still qualifies as a loop. We got to see a couple of scenic points of interest along the way including the Buffalo Farm and the Wind Towers up on Dixville Peak. Lunch at the Buck Rub, and then a return to the truck. Nice. This is the essence of what trail route planning is all about. A bit of planning can really help you maximize the experience and get the most out of any trip.
Avoiding Lake Crossings
We can view the turn by turn directions, print them out and pass them along to our non-GPS equipped friends. And we can evaluate every leg of our route with distance between turns and rough estimates of arrival times and such, Similar lists of turn by turn directions are available in your GPS. While we are reviewing these sample directions we notice something. Our route includes travel over lakes and other water bodies.
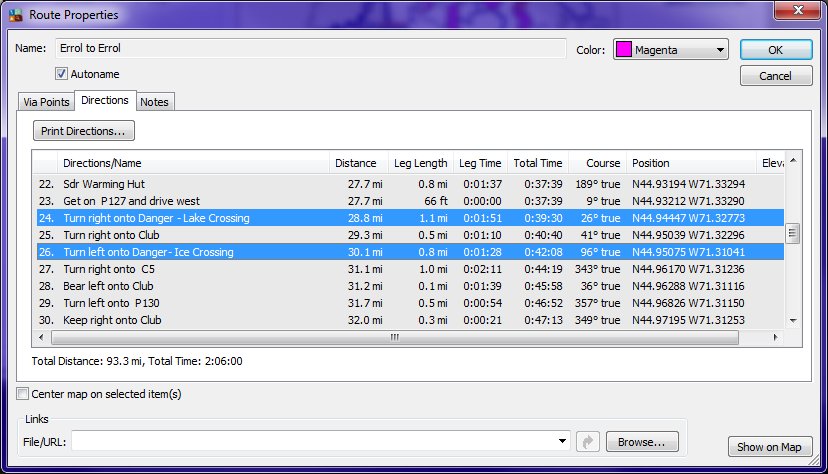
Now travel over ice on lakes and streams is always a tricky proposition. You really have to be aware of current conditions, the recent weather and other variables to know whether it is safe to traverse the ice. If you are the least bit unsure, avoid it. The consequences can be life threatening. But what do you do if your GPS tells you to cross a lake? Simple, use "navigational avoidances". Avoidances are available in both MapSource and on your GPS.
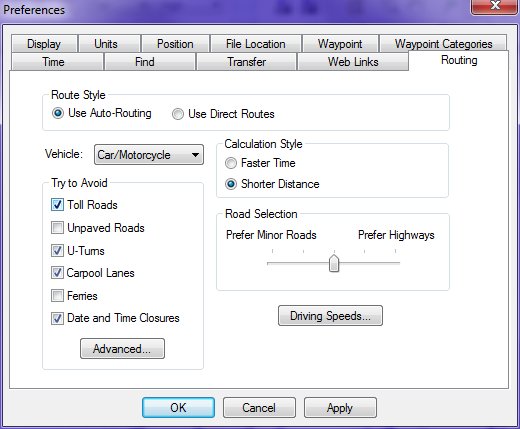
Our trail map marks all ice crossings as Toll Roads, since there is no specific "Ice Crossing" avoidance. Since all GPS models have a setting where you can choose to avoid toll roads, simply set that as a navigational preference and recalculate the route. You can do it in MapSource, and you can do it in your GPS.
In MapSource, select Edit -> Preferences -> Routing – avoid Toll Roads.
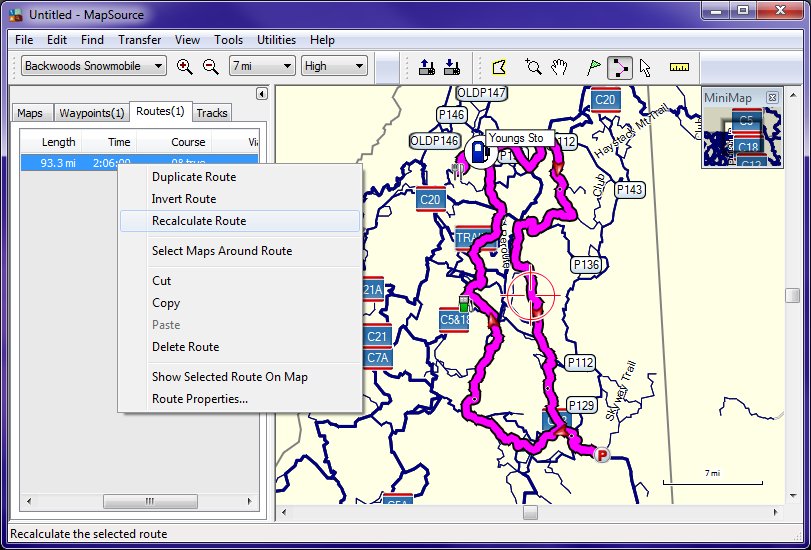
Then recalculate the route applying Toll Roads (Ice crossings) avoidances by right clicking on the route and selecting Recalculate Route as below…
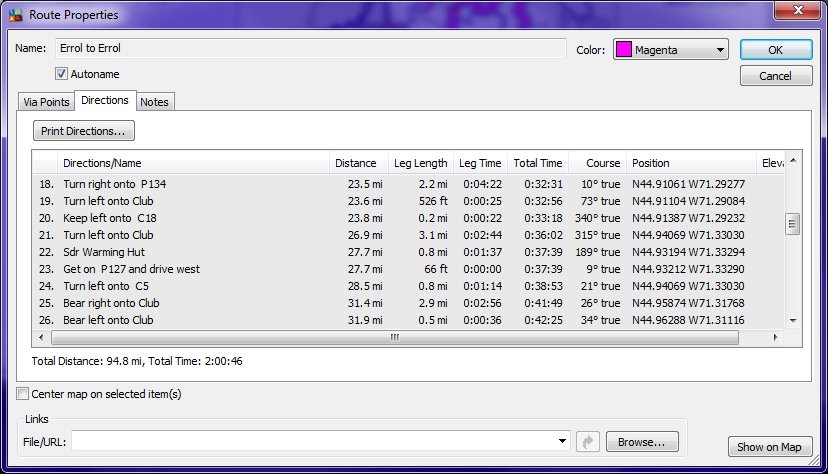
Now when we look at the map and the Route details, you will notice that there ARE NO ICE CROSSINGS. The route has changed slightly, and the resulting total mileage is not that much different.
Avoiding ice crossings is especially important in the early and late riding season where the ice may not be safe.
If you happen to be riding and encounter an ice crossing that looks unsafe, or even a closed trail, you can use the Detour button on your GPS. This will cause the GPS to recalculate the current route detouring you around the next leg. Think if it as an instant avoidance.
Avoiding off-trail riding
We have recently begun adding so called "off-trail riding trails" to the map. We define off-trail trails as trails that are unmaintained trails (not groomed nor signed), but which may still be available for snowmobile use. In most cases these will be obvious logging roads in very remote areas. Off-trail riding is very popular and accepted in very remote areas, but off-trail riding in the wrong areas can cause landowners to rescind permission and result in trail closures! The map does not give you permission to ride off-trail.. It merely suggests that it may be possible to ride these trails if you have permission and the right equipment. It is your responsibility to check with local clubs to insure that it is permissible to ride these trails. The right equipment, could mean a long track sled, a snow shovel, the willingness to dig yourself out of deep snow, a riding buddy to help dig you out, and a large budget to repair damage to your sled when you hit hidden rocks or stumps. For some this is the very definition of snowmobiling heaven. For others it is to be avoided like the plague.
To avoid being routed "off-trail" set the navigational avoidance preferences to avoid "Ferry routes" in either your GPS or MapSource. Offtrail trails are designated as "Ferry routes" to the GPS, so setting avoiding Ferry's avoids off-trail trails.
Saving your Custom Routes
At this point, if you are satisfied with your route, you might want to change the name to something meaningful, such as "94 mile Errol Loop". You should save it to a file on your computer for later use. You can save it in Garmin format (.gdb) or the more widely accessible (.gpx) format. OFF-ROAD (non autorouting) or direct routes are more compact than tracks because they only include the key route via points that you explicitly specify, and not a more extensive list of points that define a complete snowmobile trail. So if you share a direct route with somebody who does not have a our routing snowmobile map, they may not be able to calculate the route precisely along snowmobile trails, but only between route points "as the crow flies".. If you share the route with a friend that has our routing map, the map itself can be used to calculate the highly detailed route along the snowmobile trails as it did for you.
Downloading and Importing Custom Routes to your GPS
Before your trip, you will want to download your waypoints and custom routes to your GPS. Connect your GPS to your computer using a usb cable, then click on the download button. Check the boxes to download waypoints and routes.
Some GPS models, like the nuvi 500/550 have restrictions on custom routes. For a custom route to be imported into a nuvi 500 or 550, the route cannot contain more than 200 via points (map points along a route). It's doubtful that you will need more than 200 via points for even the most complex of routes. But, if a route has been calculated ON-ROAD along snowmobile trails by MapSource (or BaseCamp), the resulting .gpx file will contain hundreds of additional points that represent the additional detail of the trail that occurs between the routing points that you created. If you try and download this more complex ON-ROAD (on trail) calculated route to you nuvi 500/550, it will misinterpret these additional map points as vias. In most cases these additional map points will exceed the GPS units 200 point limit for a route and it will not allow the route to be imported. You will get an error message from your GPS that says "Unable to calculate route".
The solution to avoid this problem is to recalculate the route in MapSource as an OFF-ROAD (non-autorouting) route. To do this change your navigational preferences EDIT-PREFERENCES-ROUTING-USE DIRECT ROUTES. Then recalculate the route. This causes MapSource to produce a route that is a simple series of straight lines between the route points you specified. The route will not appear to follow precisely along the trails. This simplified route will not include the detail of the trail turns between route points, and as so is simple enough to be imported by your nuvi. Once this simple route has been loaded into a GPS with a routing trail map, you can command the GPS to recalculate the route ON-ROADS (trails in this case). That will cause the GPS to fill in all of the intermediate map points from information in the map. All of the detailed nuances of turns that follow precisely along a trail will be shown in the resulting route. You only need to recalculate the route once to get this high level of detail. Your GPS will remember the detailed route even of you power it off.
On some GPS models, such as the nuvi 500/550 it takes more than a download to make routes available to your GPS. After routes have been downloaded to the GPS you must use commands on your GPS to import the route from the file you downloaded. TOOLS–MY DATA-IMPORT ROUTE FROM FILE to enter the route into the list of 10 routes you can access. You can have many more than 10 routes stored on the device, but only 10 in the list at any one time.
Once you have imported the routing file into the custom routes list, it can be accessed by WHERE TO?-CUSTOM ROUTES-route name. You may have to edit and recalculate the route prior to previewing it. If you are not currently at the starting point of the route, the GPS will ask if you want to navigate to the start of the route.